


How to Fix Your Refrigerator in 6 Easy Steps
Have you noticed your refrigerator isn’t cooling as it normally does? Here are the steps you’ll need to take to fix your refrigerator.
Easy DIY Refrigerator Troubleshooting Guide
There’s nothing quite so frustrating as opening your refrigerator, reaching in, and noticing that it is not nearly cool enough to keep your food from spoiling. This step-by-step troubleshooting guide will show you exactly what to do to identify the issue and fix it yourself.
The best part is, if you discover the fix will require a professional appliance repair with the right tools and parts, you will be able to show them exactly what is wrong, which will save them time and you money.
Tools for the Job
Before you can begin to uncover the cooling issue, you’ll need to gather the following tools:
- Socket/ratchet set
- Wire stripper/cutter
Materials Required
- Evaporator fan and/or condenser fan (you can get these on Amazon)
Easy Fixes to a Common Problem
There are several potential reasons why your refrigerator isn’t keeping your food and beverages cold. But before we get into the more complicated repairs, let’s first take a look at the simplest fixes.
1. Be sure your refrigerator hasn’t come unplugged. Sometimes a plug can be partially knocked out of the socket when a fridge gets shoved. Maybe a family pet dislodged the cord. The fridge light should come on when you open the door. If it doesn’t, either your bulb is burnt out or the plug is not in all the way.
2. Check the thermostat to make sure it wasn’t turned down accidentally.
3. Check the vents on the back of the freezer compartment. Are they blocked by large boxes of ice cream or pizza? These vents must be clear for cold air to circulate throughout the entire freezer/fridge unit.
4. If you live in a house with pets, a lot of pet hair can accumulate in front of the coils under and behind the fridge. Clogged coils can cause poor cooling, so give your coils a thorough vacuuming.
5. Check to make sure nothing has gotten stuck in the condenser fan and that it is spinning freely. If your fridge is a newer model, it may not have a fan but instead coils on the back. For older models, unplug your fridge and pull it out. Clean the condenser fan blades and spin the fan with your fingers to see if it moves freely or is stuck. Plug the fridge back in and see if the fan runs when the compressor is running. If the fan doesn’t run, keep reading to see how to replace the fan.
Replacing Your Refrigerator’s Evaporator Fan
If you can hear your refrigerator’s compressor running but the temp inside your unit isn’t cool enough, chances are your evaporator fan is stuck or broken. One of the telltale signs of a bad evaporator fan is the sound it makes. You’ll hear a squeal or chirp when fan motor starts to go bad, and this noise gets louder when you open the freezer door.To check and replace the evaporator fan, follow the steps below:
Step 1: Remove Cover
You’ll find the cover to your evaporator compartment all the way in the back of your freezer. Remove this cover to inspect your evaporator and access the evaporator fan. If you don’t see obvious screws, they may be covered by little plastic plugs that you’ll have to pry out first.
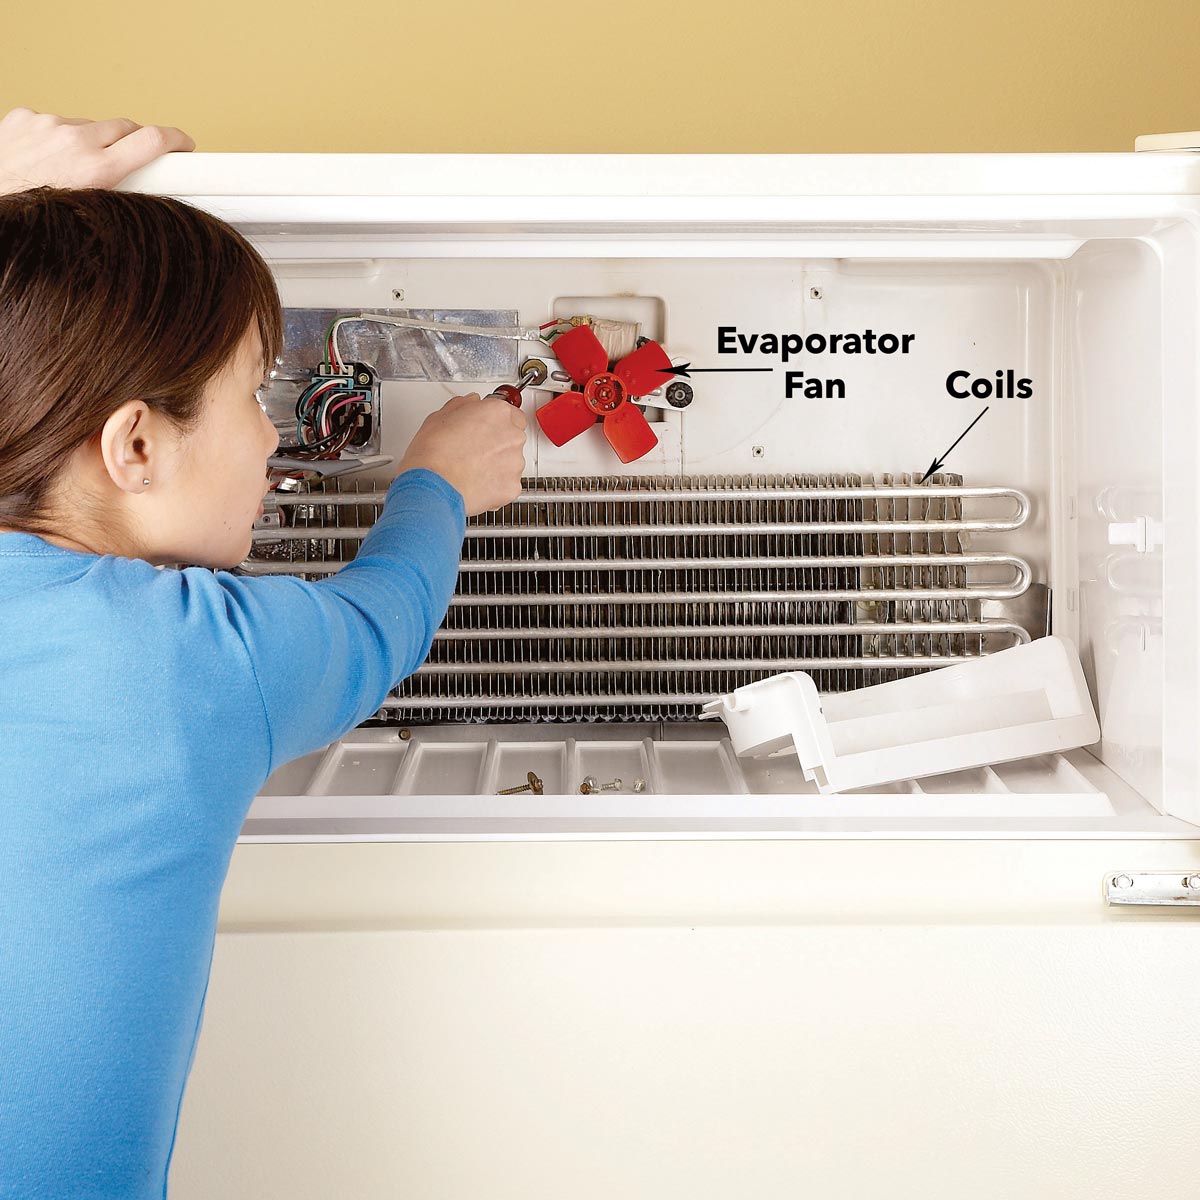
Step 2: Remove the Fan Cover
If your unit has a fan cover, you’ll need to remove the screws that hold the cover in place, then gently lift the cover off to expose the inner fan.
Step 3: Remove Evaporator Fan
If the fan is noisy or isn’t spinning, you’ll need to replace the fan motor. Be sure to unplug your refrigerator before removing the screws that hold the fan motor in place and removing the fan itself.
Step 4: Installing New Fan Motor
Remove the mounting bracket from the old fan motor and attach it to the new fan. Unplug the wires from the old fan and install them into the new fan. Screw fan back in place and replace the back cover panel.
Checking the Condenser Fan
By replacing your evaporator fan, your refrigerator should be up and running. If for some reason that didn’t do the trick, then you’ll next need to check the condenser fan.
Step 1: Locate Condenser
Unplug the fridge and pull your refrigerator unit away from the wall. Remove the thin back panel near the bottom to access the unit’s compressor and condenser fan. Plug the fridge back in and wait for the compressor to come back on. The fan should also come on. If the compressor runs but the fan doesn’t, or, if the fan is making a squeal or chirping noise, you’ll need to replace the fan.
Step 2: Remove Old Fan and Install New One
As with the evaporator fan, your unit may require you to first remove the old bracket from the fan. Next, you will need to cut the old wires as close to the old fan as possible. Strip these wires and connect them to the new fan’s wire connectors. Screw the new fan to the bracket and reinstall the fan and bracket into the back of your fridge. Replace the back cover, plug in your fridge and set it back in place.
You should now have a fridge that is once again keeping your food nice and cold.
Though these are fairly simple fixes, it’s easy to get overwhelmed if you’ve never fixed an appliance before. If at any time you need some help, just give Lee’s Appliance Repair a call (303) 722-1013. We’ve been fixing refrigerators for people in the Denver area since 1955.